Showing posts with label recipes. Show all posts
Showing posts with label recipes. Show all posts
Wednesday, October 21, 2009

Monday, February 16, 2009
Kneady Friends...
 (From L-R Jori, Kelly (with baby Georgia) Beth, Me and Betina)
It was our normal bike-buddy group, gone bread baking instead of riding.

Sue not only organized the bread day, but she acquired for each of us a set of these awesome industrial bread pans from her brother who owns a bakery. I love how they match my counter tops...A perfect addition to my kitchen. Now I just need to have the local welding shop break them up into two's...too bad I don't have a cutting torch, I could do it myself.
I love making bread. I have done it since I was about 8 years old and although I hated it at the time, I am grateful that my hands have developed a love/need for playing with dough. I began back then with a simple whole wheat bread recipe that I would make once a week or so as a "chore". Since then It has evolved into many different forms of bread. It includes rolls, hard breads, sweet breads(although I don't get to knead them), pita, pizza, pretzels etc. I rarely get intimidated by a bread recipe and generally find that making some new kind of bread is exciting. Yeast breads are my favorite. I love the smell, texture and process of them. The one thing I would say that I have not delved into is the sourdough world, that I leave to my sweet spouse who does it so well.
The other day I was thinking that if I had to be a servant in a house I would hope that my one and only chore would be the bread making!
 Here is a picture of the kids helping out with the pretzel making.
 Here are the loaves that were brought...in the back was Jori's, then mine, Beth's, and Betina's.
All were delicious and slightly different. The first 4 are my recipes (some taken from various places...sources not posted...I'll find them later. Just be happy I'm posting this!)
Pita Recipe
Makes 8
2-1/2 cups bread flour, plus more for sprinkling while kneading & rolling out dough (I use about ½ wheat)
2 teaspoons salt
1 Tablespoon sugar
2 teaspoons active dry yeast
2 Tablespoons good olive oil
1 cup warm water (105-110 degrees)
Lay aluminum foil across bottom rack of oven in the lowest
In a large bowl, combine 1 cup flour with the salt, sugar, and yeast. Add the oil and water. Beat vigorously with a wooden spoon for three minutes, then stir in the rest of the flour 1/2 cup at a time. The dough should be a rough, shaggy mass that will clean the sides of the bowl. If the dough is moist, add a small amount of additional flour.
Turn the dough onto a lightly floured work surface and knead for 6 minutes.
Preheat the oven to 500 degrees.
Divide the dough into 8 pieces. I patted the dough into a circle cut it into eighths (as if cutting up a pie).
Roll into balls, dust lightly with flour, and cover with a damp tea towel. Let rest for 30 minutes.
Use the palm of your hand to flatten each ball into a disk. Finish with a rolling pin, flattening the dough into a disk about 6" in diameter and 3/16" thick. Their thinness is more important than making them perfectly round. Irregularity adds charm.
Roll out two at a time and place on the foil in the oven.
Bake for 3.5 to 5 minutes, or until they are puffed. (mine usually never go longer than 4 min)
Repeat with the remaining disks. Letting the oven re-heat back to 500 degrees before doing the next two pitas.
When you remove the breads from the oven, stack them up and wrap them in a large piece of foil. This will keep the dough soft while the tops fall, leaving a pocket in the center. Cut them in half (so you can fill the pocket) and serve warm or at room temperature, or let cool, wrap tightly in aluminum foil, place in a zipper bag, and freeze. Thaw frozen pitas before using (this only takes about 5 minutes at room temperature). To reheat, stack several in a pile, wrap with foil, and place in a 375 degree oven for 10 to 15 minutes.
Soft Baked Pretzels
1 Tbsp Yeast
2 Tbsp Brown sugar
1 1/8 tsp. salt
1 ½ c. Warm water
3 Cups all purpose flour (or I like to use 1 cup wheat flour and ½ cup wheat gluten four to replace some of the white flour)
2 C. Warm water
2 Tbsp Baking soda
Butter (for basting the tops when finished
Kosher salt/ Cinnamon and sugar to top pretzels.
In a large mixing bowl, add yeast, brown sugar and salt. Test water temperature with thermometer. When it reads 110 degrees, add to bowl. Stir to dissolve. Add both types of flour and stir well. Place dough on floured surface. Knead dough until smooth and elastic, about 8 minutes. ** (To knead dough, press down on dough with your palm, fold the dough over and rotate 1/4 turn, repeat until dough is ready.) Grease a large bowl. Place dough in bowl then turn dough upside down to coat the surface. Cover with a towel and let rise for one hour in a warm spot. Combine 2 cups warm water (test again for 110 degrees) and baking soda in an 8-inch square pan. After the dough has risen, divide it into 12 pieces. Roll each piece into a 1.5 foot rope, ½ inch wide. Twist into a pretzel shape, and dip into the baking soda solution. Place on cookie sheets with parchment paper and let rise 15 to 20 minutes. Bake at 450 F for 8 minutes or until golden brown. Brush with melted butter, and then sprinkle with coarse salt or cinnamon sugar.
2 cups leftover oatmeal
2 3/4 teaspoons salt
2 teaspoons active dry yeast * (Next time I may add an additional ½ tsp)
1/2 cup warm water (about 105-110 degrees)
3 tablespoons honey
1/4 cup oil
5 cups finely ground whole wheat bread flour (I ended up using more)
½ cup toasted walnuts or sunflower seeds (I used a mixture of the two) Next time I will also put in some flax seed.*
If you use leftover oatmeal, bring it to room temperature.
Dissolve the yeast in the 1/2 cup of warm water.
Mix the honey, salt and oil into the oatmeal and add the mixture to the yeast. Mix well. Begin adding flour one cup at a time. If the dough is very stiff, resist the temptation to add more water just yet -- the dough will draw water from the cooked oatmeal. However, if the dough is unincorporated and is more like chunks of wet flour, add 2-4 tablespoons of water and mix thoroughly.
Cover the mixing bowl and let sit for 20 minutes. This will allow more water to be drawn from the oats and will allow for better gluten formation.
Knead the dough for about ten minutes until soft and supple. If the dough is still too stiff (i.e. when you pinch a chunk of the dough you feel it in the muscles in your hand) add a little more water gradually either by wetting your hands as you knead or by sprinkling a teaspoons or two onto the dough as your mixer kneads. Form the dough into a ball and place it smooth side up in the bowl. Cover and keep in a warm, draft-free place**. After about an hour, gently poke the center of the dough about 1/2 inch deep with your wet finger. If the hole doesn't fill in at all or the dough sighs, it is ready for the next step.
Press the dough flat and divide in two. Shape it into balls and let them rest, covered, until very much softer, 10-15 minutes. Shape gently into hearth-style or standard 8"x4" pan loaves. If you'd like, sprinkle a greased loaf pan with rolled oats before placing the shaped loaves in them. Preheat the oven to 350 degrees.
Let the loaves rise once more in a warm place until they test ready and bake about 45 minutes.
* Mix in 2-3 tablespoons toasted chopped walnuts when you shape the loaves for a nuttier flavor and a boost of omega-3s. (Next time I am going to add the nuts just after adding the flour. They seem to be better incorporated that way.)
Simple Whole Wheat Bread
Yields 3 loafs
3 Cups warm water
2 Tbsp yeast
1/3 cup honey
5 Cups Whole wheat flour
3 Tbsp butter melted
1/3 cup honey (I sometime omit this for a less sweet bread)
1 Tbsp Salt
3 ½ C. Bread flour
In a large bowl, mix warm water, yeast, and 1/3 cup honey. Let stand until bubbly. Add 5 cups of flour, mix well. Mix in butter, and optional additional honey, and salt. Mix well. Add additional 2 cups of flour. Continue to knead bread adding flour a half cup at a time until dough is soft to the touch and pulling away from bowl. Soft like a baby’s bum, but not sticking to your fingers. It should have just a slight little stick to your finger before it pulls away.
Place upside down in a greased bowl and turn over. Cover with a grocery bag and let rise in warm place until doubled. (Thanks to Allison for informing me I forgot to put in the following directions!)
Remove from bowl, divide dough into 2-3 portions ( depending on size of pans, three small/two large) and knead into nice smooth loaves tucking the edges into the bottom of the loaf. Place in pans, smooth side up. Let rise again for another 30 min or until dough is coming above rim of pan.
Bake at 350 degrees for 25-30 minutes; do not over bake. Lightly brush loaves with butter. Cool completely.
Jori's Flax & Sunflower seed bread
1 1/3 c. water (or warm milk)
2 1/4 t. yeast
1 t. salt
2 T Butter softened
3 T. Honey (You can substitute molasses)
1 1/2 c. Bread flour
1 1/3 c. Whole wheat flour
1/2 c. flax seeds
1/2 cup sunflower seeds
Dissolve yeast in warm water. Add butter & Honey. Add remaining ingredients. Knead dough for 10 min. Let rise 1-2 hours. Bake in 2 loaf pans at 350 degrees for 45 minutes.
Betina's Fabulous Honey Oatmeal Bread
2 1/4 c. Water
1 c. Honey
3/4 c. oil
Warm honey and water in microwave for 2 min.
Add oil
5 C. Wheat Flour
3 C. White four
1 C. Gluten (sometimes called gluten flour)
2 C. Oats
3 tsp. Salt
6 1/2 Tbsp Yeast
In Kitchen Aid put the wheat flour, gluten, oats, salt and yeast. Mix well.
Add warmed wet ingredients to mixture
Mix with dough hook thoroughly
Add white flour 1/2 cup at a time until dough pulls away from sides, I don't always add the full amount.
Knead with Kitchen aid 2-5 min until "it's just the right consistencey" ha. Whatever that means.
Spray K-aid bowl and dough with Pam
Wrap a plastic grocery bag around k-aid bowl (this creates a warm humid place for it to rise better). Let rise for 1 hour, or double in size.
Knead dough with hands, divide into 4 equal parts and place into small greased bread pans.
Second rising- 1 hour, or until doubled in pan.
Bake 350 for 18-22 minutes or until golden brown.
Remove from pans and cool on cooling rack.
Wednesday, September 24, 2008
Acorn Cookies

CHOCOLATE ACORNS
1 cup butter, melted and cooled
3/4 cup packed brown sugar
1 1/2 cup chopped pecans, divided use
1 tsp vanilla extract
2 1/2 cup all-purpose flour
1/2 tsp baking powder
FOR DIPPING:
1 cup semisweet chocolate chips
Preheat oven to 375 degrees F.
In a large bowl, beat together butter, brown sugar, 3/4 cup chopped pecans, and vanilla until well blended. Add flour and baking powder and mix well. Shape dough into 1-inch balls. Slightly flatten by pressing balls onto ungreased cookie sheets; pinch tops to point to resemble acorns.
Bake for 10-12 minutes. Remove from oven and cool on wire racks.
In top of a double boiler ( I just melt mine in the microwave) melt chocolate chips, stirring until smooth. Remove from heat; keep chocolate warm over water in the double boiler.
Dip large ends of cooled cookies into the melted chocolate, then roll in remaining 3/4 cup pecans. Cool on wax paper to set chocolate.
Makes 3 dozen
A delicious fall treat!

Wednesday, July 02, 2008
Asian noodle salad, Pioneer Woman style
 Last night for dinner we had this yummy Asian noodle salad. It was really delicious. I used Udon noodles rather than linguine because I didn't have any. I think it was probrably better with the Udon (a little more authentic?).
Here is the recipe...the best part is that you only have to cook the noodles. Nice cool dinner.
Asian Noodle Salad
adapted from Jamie Oliver, from The Pioneer Woman blog.
Download Printable Recipe: Asian Noodle Salad
SALAD INGREDIENTS:
1 packages linguine noodles, cooked, rinsed, and cooled
1/2 to 1 head sliced Napa cabbage
1/2 to 1 head sliced purple cabbage
1/2 to 1 bag baby spinach
1 red bell pepper, sliced thin
1 yellow bell pepper, sliced thin
1 orange bell pepper, sliced thin (if available)
1 small bag bean sprouts (also called “mung bean sprouts”)
3 sliced scallions
3 peeled, sliced cucumbers (I didn’t have a cucumber for the photos above, but they’re yummy in the salad)
LOTS of chopped cilantro—up to one bunch
1 can whole cashews, lightly toasted in skillet (again, I didn’t have them for the photos, but have used them before and they’re…sublime.)
DRESSING:
Juice of 1 lime
8 tablespoons olive oil
2 tablespoons sesame oil
6 tablespoons soy sauce
1/3 cup brown sugar
3 tablespoons fresh ginger, chopped
2 cloves chopped garlic
2 hot peppers or jalapenos, chopped
More chopped cilantro—LOTS
Mix together salad ingredients. Whisk together dressing ingredients and pour over salad. Mix with tongs or hands and serve on platter.
*Dressing keeps up to three days before serving, WITHOUT cilantro.
Tuesday, July 01, 2008
Easy picnic meal
Last night for our FHE outing I found a delicious recipe in my Moosewood Restaurant Cooks at Home cook book, which I might also add is one of my favorite cook books.
The recipe is Pan Bagnat (or literally means "bathed bread" in French).
Pan Bagnat
The recipe is Pan Bagnat (or literally means "bathed bread" in French).
Pan Bagnat
1 baguette or other thin loaf of French bread ( I used some yummy crusty bread)
1 garlic clove, pressed
1/4 cup olive oil (or what you decide to use)
1 tomato, thinly sliced
1 cucumber thinly sliced
1.2 red onion, thinly sliced
1/2 cup sliced olives black or Calamata
salt/pepper
Other optional ingredients:
Provolone cheese
2 hard boiled eggs
1 red or green bell pepper, thinly sliced
1/4 cup of capers
1 cup artichoke hearts, sliced into quarters
1/2 cup pesto
herbs such as basil, oregano, thyme, marjoram
Slice bread in half lengthwise, open loaf and spread garlic on one of the cut sides. Drizzle olive oil on both sides. Layer ingredients on one half of the bread. Sprinkle with salt and pepper. Close the loaf, and wrap tightly in saran wrap. Weight the full length of the bread with a heavy book (or with a baking tray topped with bricks, a 25 pound weight, a toddler, or whatever you can find for 1-3 hours.
(It even mentioned that if you are taking it on a picnic put the loaf UNDER the cooler.)
I didn't take a picture but belive me it was delicious...and the best part was that it could get squished. The kids even seemed to enjoy it.
I pre-mixed oliveoil, garlic scapes, onion, balsamic vinegar, and parmesean cheese, ann my fresh herbs (basil, oregano, and thyme) all together and then smeared the soncotion onto both sides of the brad before putting all of the other ingredients in. It seemed easier and it turned out delicious.
It was quick, delicious and require NO COOKING!
Good eats for a summer evening.
1 garlic clove, pressed
1/4 cup olive oil (or what you decide to use)
1 tomato, thinly sliced
1 cucumber thinly sliced
1.2 red onion, thinly sliced
1/2 cup sliced olives black or Calamata
salt/pepper
Other optional ingredients:
Provolone cheese
2 hard boiled eggs
1 red or green bell pepper, thinly sliced
1/4 cup of capers
1 cup artichoke hearts, sliced into quarters
1/2 cup pesto
herbs such as basil, oregano, thyme, marjoram
Slice bread in half lengthwise, open loaf and spread garlic on one of the cut sides. Drizzle olive oil on both sides. Layer ingredients on one half of the bread. Sprinkle with salt and pepper. Close the loaf, and wrap tightly in saran wrap. Weight the full length of the bread with a heavy book (or with a baking tray topped with bricks, a 25 pound weight, a toddler, or whatever you can find for 1-3 hours.
(It even mentioned that if you are taking it on a picnic put the loaf UNDER the cooler.)
I didn't take a picture but belive me it was delicious...and the best part was that it could get squished. The kids even seemed to enjoy it.
I pre-mixed oliveoil, garlic scapes, onion, balsamic vinegar, and parmesean cheese, ann my fresh herbs (basil, oregano, and thyme) all together and then smeared the soncotion onto both sides of the brad before putting all of the other ingredients in. It seemed easier and it turned out delicious.
It was quick, delicious and require NO COOKING!
Good eats for a summer evening.
Tuesday, February 26, 2008
Fun recipes
Lent Worthy recipes...and tasty too! Here is the recipe for some tasty Swiss Chard with cannellinni beans recipe.
I really like this recipe and it made a good use for tasty chard.
 Little Lion Snack
 (Ummmm...Delicious bread...look I couldn't wait to get a piece!)
Here is the recipe I used and it was a pretty great and easy recipe. I used Whole hard-white wheat flour for the entire recipe and it was delicious!
Enjoy!
 Here is the recipe for some tasty Swiss Chard with cannellinni beans recipe.
I really like this recipe and it made a good use for tasty chard.
 Little Lion Snack
This has been one of our favorite snacks lately...take a canned pear, grate some cheese for the mane, and use chocolate chips or raisins for eyes. They love it!
 (Ummmm...Delicious bread...look I couldn't wait to get a piece!)
Here is the recipe I used and it was a pretty great and easy recipe. I used Whole hard-white wheat flour for the entire recipe and it was delicious!
Enjoy!
Sunday, February 10, 2008
Pot Stickers!
 (Wrapped, pre-cooked form, before the pan steaming process)
(I didn't get the picture taken before most of them were eaten)
 | |
| Vegetarian Potstickers By: Ming Tsai | |
| 1 red onion sliced 1 tablespoon minced ginger 1 cup sliced shiitake mushrooms 1 cup white cabbage, shredded 1 cup carrots, shredded 1 cup chopped garlic chives or chives 1 teaspoon white pepper 1 teaspoon sesame oil 1/4 cup chopped cilantro 1 package round dumpling skins, also called gyoza (preferably twin dragon brand) Salt to taste Serve with dipping sauce. SPICY SOY DIPPING SAUCE:1/3 cup thin soy sauce |
Sunday, December 09, 2007
Bethlahem Feast
 My good friend Reem who is from Palestine taught me how to make this yummy dish last Monday. She doesn't use "recipes" so the following information is my interpretations on how to make yummy Baba Ganoush.
Two fresh pretty egg plants(above you see four because I was doubling the recipe)
1 large container plain yogurt ( I like Nancy's and that is the kind Reem uses too)
1 bunch Parsley finely chopped (not mushed in a food processor)
1-2 Tbsp dried mint
4-5 Tbsp olive oil (to taste)
Salt (to taste)
Pepper ( to taste)
1-2 cloves garlic finely mushed
Take eggplant and place on cookie sheet and bake at 350 degrees for about 1 hour or until cooked through.
Remove from oven and place in a bowl and fill with cold water. Let sit to cool.
When cooled peel off the skin and remove top part of plant. Finley chop or blend up the cooked eggplant. (I used our magic wand and it worked great, you could also use a food processor)
Next add lots of yogurt...this it the main ingredient. Then add the parsley to taste and remaining ingredients.
When it is all combined you should have a nice whitish looking dip that has a light soft taste of parsley, mint, olive oil, garlic and eggplant.
This is very delicious on pita bread!
 Falafel!
Here are the mini falafels (I'll post this recipe later) I made to take to our ward party...this is the pre-fried photo.
I was going to make sure to post a list all of the fun items I had on the ethnic tables and I will do so now. I forgot to take pictures so you will just have to link to some of the recipes since I pulled them off the internet...
Pita's
1 cup water
2 tsp dry yeast
1 TBsp Sugar
2 tsp salt
2 TBsp olive oil
2 1/2 Cup Bread flour (or combination of wheat/white)
Preheat oven to 500 degrees- remove top rack and place remaining rack on lowest setting, covered with tin foil.
Combine water, yeast, and sugar in mixing bowl. let rest until bubbly.
Add salt and olive oil
Mix well
Begin adding flour 1 cup at a time. Knead bread until soft, moist but not sticky. You will want the dough to be pliable and a little moist (like a babies bum)
Next knead all of the dough into a disk on the counter, cut it like a pizza into 8 equal parts. Roll each part into a nice round ball and set on floured surface. Cover balls with moist cloth or paper towels to avoid drying out. Let raise for 30-40 mins.
When pre-heated roll out 2 balls into nice disk(pita shapes) not too thin about 1/8 inch thick. Place both disks evenly on the tin foiled rack. Bake for 4-6 minutes (Mine are usually done by 4 minutes). Roll out next two disks while waiting for the others to cook.
Remove finished pitas from oven( I use a spatula to pick them up so that I don't puncture the pocket) and stack on top of each other to cool (this will help them to collapse). Wait for oven to pre-heat back to the 500 degrees (I watch my little light to tell me when) then add the next two pita disks. Cook for 4-6 minutes and keep repeating.
Store in zip lock bags after cooled. Can also freeze to remain fresh.
Hummus...
2 cans Garbanzo Beans (drained, reserve some liquid)
1/3 Cup Tahini (you can find this usually by the peanut butter...or health food section of store)
1-2 Cloves Garlic (minced)
2 tsp Lemon Juice
1/2 tsp Cumin
1-2 TBSP Olive oil
Salt and Pepper to taste
Take ingredients and place in a blender or food processor. Blend until it is nice and smooth. Add some of the liquid if the consistency is too thick. Add more lemon juice or oil to taste.
Make some Pitas and enjoy!
Tabouli Salad-
Grape leaf rolls-
Reem made these and they consist of rice with lemon juice, broth, olive oil, salt and pepper, wrapped in pickled grape leaves...very delicious.
Lebanese cookies- Click Here for recipe
Iraqi Cardamom Cookies -Click Here (these were my favorite of the three)
Date almond balls Tam'r ab Loze-Click Here
I have also gained a better appreciation for the the story of Christ feeding the 5,000! Truly amazing! I suppose I need to sharpen up my faithfulness and maybe next year I will be ready to test my faith and only make one batch of pitas and other stuff etc...
Let me know if you try any of the recipes and if you like them!
Sunday, September 23, 2007
Seasonal Sampler
 (Poppy donning her fall fashionable layers...really she asks to wear a jacket ALL of the time...Just like me! She also isn't afraid to wear a mommy shirt as a skirt!)
With 61 degree temperatures (in my house) greeting me each morning, I am reminded if the seasonal change that is taking place around me. Forcing me to adorn myself with multiple layers of clothing in an attempt to conserve my precious warmth!! Blasted cold weather! I know, I know, it is only going to get colder...I need no reminder...It is just that summer went so quickly, and now, I find myself scrambling to soak in the last bit of sunshine and green that I can before the doom and gloom arrives!
On one cloudy morning this week, Oscar exclaimed "mom I wish there was no such thing as clouds!" My response was, "well, if we didn't have clouds we wouldn't have snow to ski on or rain to water our plants." To this Oscar replied, "I wish the stars would rain or snow so it would never be cloudy."
Yes, He must be my sun loving child...
 Oscar also began fall soccer, this could be one of the saving graces of fall transition. It is very fun watching our little tike run on the field (mainly in the direction of the wrong goal) full of excitement. He really is liking soccer, even if the logistics of what the game is all about, are still quite unclear!
 Ahhh...another good thing of fall...TOMATOES! Yes we are basking in the remaining abundance of tomatoes, that is until the first frost. Above is the latest canning success! The recipe comes from Betina by way of her friend Beth Moxley...
Salsa
makes 10-11 pints
20 C ripe tomatoes, Italian plum type work best, peeled and chopped
3 C chopped onions
2-3 chopped green peppers
3-8 jalapeno peppers, chopped, the number depends on how spicy you like your salsa! (NOTE: wear rubber gloves when handling these peppers, the oil and juice can burn your skin)
1 C vinegar
3/4 C sugar
1/4 C NON-IODIZED SALT
2 t dried chili seed (sometimes it's called crushed (not ground) red pepper)
1 t cayenne (this is the ground red pepper)
2- 12 oz cans tomato paste
parsley and cilantro to taste
Put all together in large kettle. Cook over low heat (simmer) to desired consistency.
Process in water bath canner: 30 minutes pints; 40 minutes quarts
***NOTE: Can just quarter un-peeled tomatoes and pulse a couple times in the food processor. I use 3-4 jalapenos, it's spicy enough for Roy.
Oscar, who doesn't like salsa, tasted some and liked it so it is a yummy kid-friendly version. Rick and I devoured a half-pint in just a few hours....very tasty! I plan to make another batch this week.
 And just in case you thought that our Kindergartener had out-grown the Super-stage, don't worry...he still isn't afraid to strike a pose! In fact Poppy now will ask Rick and I frequently if there are "Bad Guys coming"...She can be seen trailing along with Oscar in Super hero play...I suppose they too are prepping for the up-and-coming indoor play...Goodbye Summer 2007!
Sunday, August 05, 2007
Lazy Summer Sampler...
Week two post Marathon...I also had all of my spinning classes canceled for the week. I spent the majority of the week taking a break from real exercise. Yesterday I did do a 10mi run and it felt great! I'm grateful for the nice week-long break.
It was kinda nice not having any schedule to stick to. We spent a bunch of time at home catching up on stuff and hanging out. Here are some tidbits of our week...
 Double Dive from the Ricky and Lil'O...A certain sign of summer is spending every evening (or most) at the pool. We look forward to meeting dad there after work.
Oscar and I also went "school shopping" for the first time. I'm sad to see my little boy growing up! He is such a great kid. I"m sure it will come as no surprise when I tell you that every piece of clothing he chose was of "hero" variety...I let him choose, which is also a big step (for both of us)!
 Big Girl panties!! Potty training Pops...going quite well, she is very interested and stays fairly dry...She also lost all of her Binky's this week. So we have decided not to purchase any more...we are therefore Binky-free (it has been hard on her going to sleep, but tonight she only cried for 1/2 hr rather than 2). I'm not sure I like making these big growing-up steps all at once...she's now no longer a baby!
 Spending some time at the river with friends...Poppy actually even did quite well missing her nap. Oscar not pictured due to his exploration along the beach and too busy for me to take a pic!
 Ummmmm.....fresh home-made-hand-cranked ice cream! Ricky scored a vintage hand churn ice cream maker on eBay for $30. Tonight was the trial run using Autie Em's tasty recipe.
I'm certain this is the first of many more ice cream making days to come...hopefully my waist doesn't expand with our new addition!
Ice cream recipe...
3 Cup Cream
1 Cup Milk
3 Egg Yolks
1 1/2 Cups Sugar
Vanilla (to taste)
Heat cream and milk until scalding. Beat sugar into yolks. Pour scalding milk into yolks while beating. Add some vanilla (1 tsp-ish) cool.
Freeze
It was kinda nice not having any schedule to stick to. We spent a bunch of time at home catching up on stuff and hanging out. Here are some tidbits of our week...
 Double Dive from the Ricky and Lil'O...A certain sign of summer is spending every evening (or most) at the pool. We look forward to meeting dad there after work.
Oscar and I also went "school shopping" for the first time. I'm sad to see my little boy growing up! He is such a great kid. I"m sure it will come as no surprise when I tell you that every piece of clothing he chose was of "hero" variety...I let him choose, which is also a big step (for both of us)!
 Big Girl panties!! Potty training Pops...going quite well, she is very interested and stays fairly dry...She also lost all of her Binky's this week. So we have decided not to purchase any more...we are therefore Binky-free (it has been hard on her going to sleep, but tonight she only cried for 1/2 hr rather than 2). I'm not sure I like making these big growing-up steps all at once...she's now no longer a baby!
 Spending some time at the river with friends...Poppy actually even did quite well missing her nap. Oscar not pictured due to his exploration along the beach and too busy for me to take a pic!
 Ummmmm.....fresh home-made-hand-cranked ice cream! Ricky scored a vintage hand churn ice cream maker on eBay for $30. Tonight was the trial run using Autie Em's tasty recipe.
I'm certain this is the first of many more ice cream making days to come...hopefully my waist doesn't expand with our new addition!
Ice cream recipe...
3 Cup Cream
1 Cup Milk
3 Egg Yolks
1 1/2 Cups Sugar
Vanilla (to taste)
Heat cream and milk until scalding. Beat sugar into yolks. Pour scalding milk into yolks while beating. Add some vanilla (1 tsp-ish) cool.
Freeze
Thursday, August 02, 2007
Summer Delights

 Can you see the likeness of my fresh apricot-ginger jam and the bucket full of Poppy? They both are an abundance of bottled up sweet/spicy goodness. Speaking of which...I decided to start potty training yesterday...after 10 pairs of undies and a "edge" of frustration, we have morphed into the half-potty trained girl who is currently wearing a pull-up and occasionally will sit on the potty.
 Who was I kidding when I thought the "girl"-potty training would go easier than the previous "boy" experience...She is about 6 months earlier than him though. I should also note that she has perfected the art of potty training her two dolls. They now occupy the potty more than she does!
 Birchermüesli
 Cut up a variety of different fruit (the more the better). Like a huge fruit salad.
Add enough raw regular oats (no quick-cooking) to the fruit to lightly coat the fruit. (you can add more later if you choose.
Next take a container of Yogurt (any kind but plain) and add until the fruit and oats are well moistened and a goulash looking blend.
For an added tasty goodness we add a little bit of cinnamon, ginger, or nutmeg.
Let it sit for 1/2 hour (if you can wait that long) for the oats to soften, and eat!
My kids love the stuff and the leftovers make a great breakfast!
As a child this was the epitome of a summer time dinner. My Mom who is a Swiss miss, used to make this tasty treat on the hot summer days, when you want something more than Popsicles for dinner, but no cooking.
The original recipe looks something like this. My Aunt Sylvia (Mom's sister) had Tuberculosis as a child and was sent to a sanatorium. While there, this is a meal they would frequently feed the patients. If you look at the link I posted, it gives the original recipe (made with milk, cream and honey) and they give a little history to the recipe. I however have modified it slightly and made it into an even simpler summer treat!
Wednesday, June 06, 2007
mmmm...Pitas and Hummus!
I LOVE pitas and hummus...especially when they are home made! Today I made both and had some friends over for lunch. So, I though I would share our lunch with you...
Hummus...
2 cans Garbanzo Beans (drained, reserve some liquid)
1/3 Cup Tahini (you can find this usually by the peanut butter...or health food section of store)
1-2 Cloves Garlic (minced)
2 tsp Lemon Juice
1/2 tsp Cumin
1-2 TBSP Olive oil
Salt and Pepper to taste
Take ingredients and place in a blender or food processor. Blend until it is nice and smooth. Add some of the liquid if the consistency is too thick. Add more lemon juice or oil to taste.
Make some Pitas and enjoy!
Pitas
The recipe I use comes from the Foodie Farmgirl blog.
2-1/2 cups bread flour
2teaspoons salt
1 Tablespoon sugar
2 teaspoons active dry yeast
2 Tablespoons good olive oil
1 cup warm water (105-110 degrees)
My version is only different because I use a kitchen aid to do the kneading
This is how I do it...
Place water, sugar, and yeast in bowl and let stand 5 minuets or until it starts getting bubbly.
Next add oil, and salt. Begin adding flour, a little at a time until the dough is slightly sticky, but firm. remove from bowl and cut into 6 equal size pieces (the foodie farm girl does 8 pieces but I like bigger pitas) roll in to six balls and let stand on floured counter for 40 min. Cover with a wet towel while standing.
Next warm up the oven to 500 degrees. cover bottom rack of oven with tin foil. Roll out two-3 pitas at a time and place on pre-heated oven rack for 4-5 minutes until puffy and golden. remove and stack on top of each other, so they deflate. I put my leftovers (if there are any) in zip lock bags and store them or freeze them. They also make great pita pizzas or pita chips to go along with the yummy hummus.
For a more detailed recipe and pictures check out the foodie farmgirl.
I think these pitas are really easy and quick since they only have to raise 40 mins.
Enjoy!
Hummus...
2 cans Garbanzo Beans (drained, reserve some liquid)
1/3 Cup Tahini (you can find this usually by the peanut butter...or health food section of store)
1-2 Cloves Garlic (minced)
2 tsp Lemon Juice
1/2 tsp Cumin
1-2 TBSP Olive oil
Salt and Pepper to taste
Take ingredients and place in a blender or food processor. Blend until it is nice and smooth. Add some of the liquid if the consistency is too thick. Add more lemon juice or oil to taste.
Make some Pitas and enjoy!
Pitas
The recipe I use comes from the Foodie Farmgirl blog.
2-1/2 cups bread flour
2teaspoons salt
1 Tablespoon sugar
2 teaspoons active dry yeast
2 Tablespoons good olive oil
1 cup warm water (105-110 degrees)
My version is only different because I use a kitchen aid to do the kneading
This is how I do it...
Place water, sugar, and yeast in bowl and let stand 5 minuets or until it starts getting bubbly.
Next add oil, and salt. Begin adding flour, a little at a time until the dough is slightly sticky, but firm. remove from bowl and cut into 6 equal size pieces (the foodie farm girl does 8 pieces but I like bigger pitas) roll in to six balls and let stand on floured counter for 40 min. Cover with a wet towel while standing.
Next warm up the oven to 500 degrees. cover bottom rack of oven with tin foil. Roll out two-3 pitas at a time and place on pre-heated oven rack for 4-5 minutes until puffy and golden. remove and stack on top of each other, so they deflate. I put my leftovers (if there are any) in zip lock bags and store them or freeze them. They also make great pita pizzas or pita chips to go along with the yummy hummus.
For a more detailed recipe and pictures check out the foodie farmgirl.
I think these pitas are really easy and quick since they only have to raise 40 mins.
Enjoy!
Wednesday, March 28, 2007
The Eaton Ranch and a recipe...


 Today we Edgies had the pleasure of going to the Eaton ranch. This is owned by Nikki (a friend I met who takes my spinning classes) and her family. They raise organic beef...If you are in the market for some sweet beef check out thier website.
 We had the pleasure of roaming the Wawawai grade hills, shovel in hand, eliminating the thistles that dared to rear their fuzzy heads. The kids and Smiley had a great time roaming in the freedom that only a farm can bring. Here are a few pics from the day trip.
Recipe: This is a tasty recipe we like to eat over rice. Poppy loves the stuff... Hope you like it. I would give you the source for the recipe but, my lawyer husband informed me it would be copyright infringement. So, I omitted the source. If you like the recipe and want more like it let me know and I'll tell you where I found it! ;0)
Recipe: This is a tasty recipe we like to eat over rice. Poppy loves the stuff... Hope you like it. I would give you the source for the recipe but, my lawyer husband informed me it would be copyright infringement. So, I omitted the source. If you like the recipe and want more like it let me know and I'll tell you where I found it! ;0)
Cajun Skillet Beans
1 medium onion,
chopped 2 garlic cloves, minced or pressed
2 tablespoons vegetable oil
3 celery stalks (about 1 cup chopped)
2 green or red bell peppers (about 1 1/2 cups chopped)
1 teaspoon chopped fresh thyme (1/2 teaspoon dried)
1 tablespoon chopped fresh basil (1 teaspoon dried)
1 teaspoon chopped fresh oregano (1/2 teaspoon dried)
1/4 teaspoon ground black pepper (or more to taste)
pinch each cayenne and salt
2 cups chopped fresh or canned tomatoes (14.5 ounce can)
1 tablespoon honey or molasses 1 tablespoon Dijon mustard
4 cups cooked black-eyed peas or navy beans (2 10 ounce frozen packages or two16-ounce cans, drained)
chopped scallions (optional) grated cheddar cheese (optional)
In a heavy saucepan or skillet, saute the onions and garlic in the oil on medium heat. Chop the celery and bell peppers and add them to the pan. Continue to saute for about five minutes, stirring occasionally. Add the thyme, basil, oregano, black pepper, cayenne, and salt. Cover and cook for five minutes or until the onions are golden, stirring once or twice. Add the tomatoes, honey or molasses, and mustard, and simmer for 5 more minutes. Add the beans, cover, and stir occasionally until thoroughly heated. Canned beans will be hot in less than 10 minutes, but frozen beans need to simmer for 15 to 20 minutes. Top with scallions or grated cheese if desired, and serve.
Tuesday, December 19, 2006
Tradition...Tradition...
 Traditions, the fun things we do together as families that when one thinks back to a certain holiday or event immediately our brains process the thread that pulls all of them together, traditions.
This year we are going to be experiencing our very first Christmas with just us four (five if you count smiley) family members.
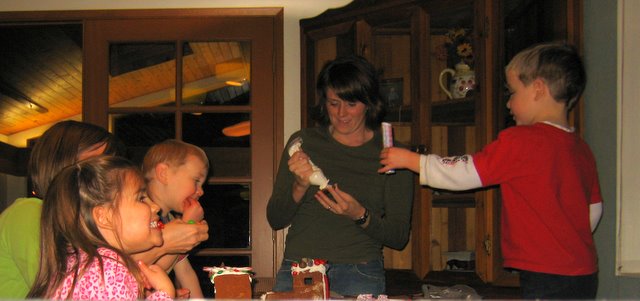
Among other activities we experienced the joy of making a gingerbread train! Betina, Kenneth, Eden, and Oakley joined us in the fun-filled process of creating a candy heap of a train!
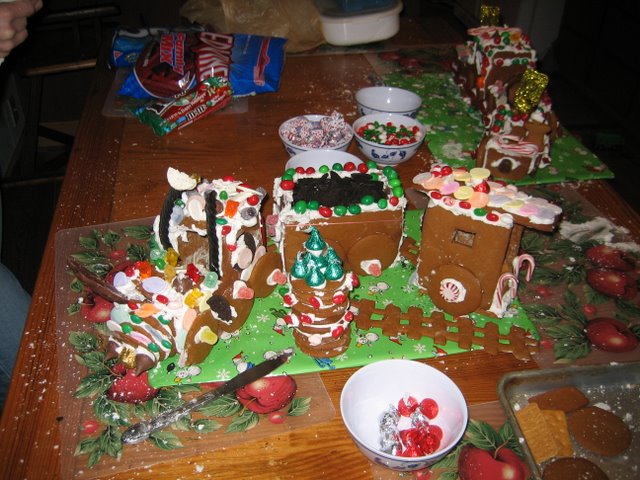
Here are some pictures of last nights FHE ginger experience. You can get a glimpse of the Workman's train in the background.
Oscar really enjoyed making the train but was quite disappointed when I informed him we will not be eating it until Christmas day. This morning after breakfast he said "mom I just can't
 wait till Christmas to eat it!" He did manage to knock a small piece off and I allowed him to eat the piece. I wonder if this will become a pattern? Him accidentally bumping it????
Tee next item to report is that I have completed a few projects that have been lingering in the back of my mind for days!!! Oscar and I sorted through our toys today and organized them into tidy little containers. We also sorted out the toys we no longer play with and will take them to good will tomorrow!!! Woo hoo! To some this may seem trivial, but the thought of getting new toys for Christmas, just to be stacked on top of all the other toys was weighing heavy on my clutter conscious brain!
We can now have Christmas! This also was what Rick wanted for Christmas. He asked Santa to get rid of some things for his Christmas present. Therefore I have now killed two birds with one stone. I will ask the Good Will to give me a receipt, and then I'll wrap it up for my hubby for Christmas. (Rick if you read this you can just act surprised on Christmas morning!)
The last picture is the finished product! If you are wanting a fun project to do here is a link to the train recipe and templates. There should be one more train car on our train but we ran out of space on our wrapped cardboard. Good thing about that is that we could eat the leftovers!
If you have any other cool tradition ideas leave me a comment and we'll see what cool traditions we can develop.
Subscribe to:
Posts (Atom)